ĐÀO TẠO DOANH NGHIỆP : SỞ KHOA HỌC CÔNG NGHỆ TỈNH ĐỒNG NAI

ENTERPRISE TRAINING: DONG NAI DEPARTMENT OF SCIENCE AND TECHNOLOGY.

HÌNH ẢNH TẬP HUẤN LỚP SHAREPOINT WORKFLOW VÀ KIẾN TRÚC SHAREPOINT

PHOTOS OF SHAREPOINT WORKFLOW AND ARCHITECTURE CLASS.

HÌNH ẢNH TẬP HUẤN LỚP SHAREPOINT WORKFLOW VÀ KIẾN TRÚC SHAREPOINT

PHOTOS OF SHAREPOINT WORKFLOW AND ARCHITECTURE CLASS.

Sunday, March 4, 2012

Article 1: How to create new document sets on sharepoint 2010


Open your site
Click Action | Site Settings
In Galleries | click “Site content types”
Click to link “Create”
Set properties follows as:
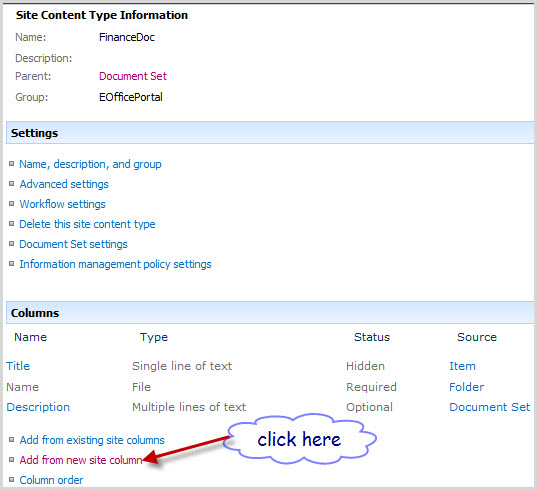
After create content types successful, click to hyperlink “Add from new site column” to add column for content types
Enter name StatusField, choice data type (option)
Create new group for column content types
Back to top level site, click to Site Actions | Site Settings, under Site collection Administrator choose Site collection features
Active Document Sets feature
Open your document library | Library Settings | Advanced settings
At “Allow management of content types”, choose Yes
After “Allow management of content types”, will appear Content types follows as then click to hyperlink “Add from existing site content types”
On “Select site content types from”: choose EOfficePortal
Add content type “FinanceDoc” then click OK
Content type is added to library
Open your library where you configure content type, you see on menu “New Document” appear content type “FinanceDoc” and click to it
Set Name 
After create document sets, you can upload document to there
Document is added to document sets

Article 2: Workflow visual for content types (Document sets)


Open file Elements.xml of workflow, see tag <AssociationCategories>List</AssociationCategorieswith category is List
Change Category from List to ContentType follows as
Build and deploy workflow then open your site | Open your list where workflow is deployed | Add a workflow on Ribbon
Choose your content type “FinanceDoc” then choose workflow
Input name’s workflow
After create workflow finished, see workflow on content type “FinanceDoc” follow as:
But choose Content type “Folder”, you don’t see any workflow and any workflows other

Open your  library then Add new Content Type “FinanceDoc”
After create finished, you see workflow is running
Upload some documents, but workflow only run on content type is Document Sets “FinanceDoc”. Item is added but workflow don’t run on it.

Article 3: Create new document sets and upload document using webpart


Download source at here

using System;
using System.Web.UI;
using System.Web.UI.WebControls;
using System.Web.UI.WebControls.WebParts;
using System.Collections;
using Microsoft.Office.DocumentManagement.DocumentSets;//Add reference
using Microsoft.SharePoint;
using System.IO;


namespace SPTWPNewPurchaseRQ.SPTWPNewPurchaseRQ
{
    public partial class SPTWPNewPurchaseRQUserControl : UserControl
    {
        protected void Page_Load(object sender, EventArgs e)
        {
            txtDateRequest.Text = DateTime.Now.ToShortDateString();
        }

        protected void btnSave_Click(object sender, EventArgs e)
        {
            if (txtTitle.Text != "")
            {
                SPWeb spWeb = SPContext.Current.Web;
                String documentLibraryName = @"PurchaseRequest";//   
                SPList purchaseRequest = spWeb.Lists["PurchaseRequest"];
                SPContentType documentSetContentType = purchaseRequest.ContentTypes["FinanceDoc"];//FinanceDoc name of Content Type
                //Declare to get File Name
                string documentSetName = txtTitle.Text;
                //Declare Hashtable
                Hashtable properties = new Hashtable();
                properties.Add("DocumentSetDescription", txtDescription.Text);//DocumentSetDescription => InternalName
                properties.Add("Date1", txtDateRequest.Text);
                properties.Add("DepartmentRequest", ddlDepartment.SelectedValue.ToString());
                properties.Add("Total", txtTotal.Text);

                SPFolder parentFolder = purchaseRequest.RootFolder;
                //Create new Document sets
                DocumentSet.Create(parentFolder, documentSetName, documentSetContentType.Id, properties, true);
                //Declare to upload file to document set, only run on IE
                String fullPathFileName = fileUpload1.PostedFile.FileName;
                //Check file is exists?
                if (!System.IO.File.Exists(fullPathFileName))
                    throw new FileNotFoundException("File not found.", fullPathFileName);
                //Declare path to document set
                SPFolder myLibraryToUploadDocument = spWeb.Folders[documentLibraryName].SubFolders[txtTitle.Text];
                // Prepare to upload
                Boolean replaceExistingFiles = true;
                String fileName = System.IO.Path.GetFileName(fullPathFileName);
                FileStream fileStream = File.OpenRead(fullPathFileName);
                // Upload document
                SPFile spfile = myLibraryToUploadDocument.Files.Add(fileName, fileStream, replaceExistingFiles);
                // Commit
                myLibraryToUploadDocument.Update();
                //web.GetFile(web.Url + "/" + destinationFolderUrl + file.Name);
            }
        }
    }
}

Article 4: Create custom view within document set library


1. Define a new view for the document library, with the columns you want to display within the internal library of the document set (for instance “documentSetDetail”)
2. Go the the document library settings (From the library tab of the ribbon)
3. Choose the document set content type from Content Types
4. Select Document set settings
5. You will now see a drop down list under “Welcome page view” where you can select default view 
There you have it: different views in the document library and within the document set.
views in the document library
views within the document set

Article 1: Opening pdf from Sharepoint 2010 Document Center


When click to any document (PDF), your browse will require download document
Go to the Central Administration | Application Management | Manage web applications | choose your web application | On tab Web Applications | General settings ribbon | select General settings menu
Browser File Handling with default is Strict, change to Permissive
Open your document library and click to document, but your browser still request download document (pdf)
You should setup Adobe Reader or Adobe Reader X
Then back to your document and click to pdf document, pdf file was opened on browser automatically

Article 2: Display PDF icons to PDF documents in a SharePoint Library


Go to folder with path “C:\Program Files\Common Files\Microsoft Shared\Web Server Extensions\14\TEMPLATE\IMAGES” then copy pdf.gif and paste to here
After you copy the picture file you need navigate to “C:\Program Files\Common Files\Microsoft Shared\Web Server Extensions\14\TEMPLATE\XML” then edit file in notepad
And edit the DocIcon.xml with notepad and add the line
Add an entry to support PDF files.
<Mapping Key="pdf" Value="pdf.gif"/>
You must reset iis by click start | run then enter iisreset
Open document library, you will see icon pdf with document file is pdf

Article 3: Edit pdf with adobe Adobe Reader X and Adobe Acrobat X Pro


Download adobe Reader X and Adobe Acrobat X Pro and setup it
The first step that most people are familiar with is the addition of a mapping in the DOCICON.xml file. For those who aren’t the steps are:
1.       Edit DOCICON.XML
a.       Path: C:\Program Files\Common Files\Microsoft Shared\Web Server Extensions\14\TEMPLATE\XML\DOCICON.XML
2.       Add an entry to support PDF files.
a.       <Mapping Key="pdf" Value="icpdf.png" OpenControl="AdobeAcrobat.OpenDocuments" />
      3. download icon png and set name is icpdf.png then save to “C:\Program Files\Common Files\Microsoft Shared\Web Server Extensions\14\TEMPLATE\IMAGES”

Please note the second part of the entry EditText="Adobe Acrobat" OpenControl="AdobeAcrobat.OpenDocuments"  which is critical to achieving the Edit in functionality

This step will provide a nice link that allows users to edit documents in Adobe Acrobat.
When click to “Edit Document”, automatic adobe Acrobat Pro open and request check out & Open, click to button Check Out & Open
Comment document
Back to your site, you see your document is checked out
Back to adobe Acrobat Pro, continue edit and when edit finished you can check in document by click to menu File | Sharepoint Server | Check In
Comment document version
After finished, you back to your site and see document is checked in
Moreover, can see version history follow as: