ĐÀO TẠO DOANH NGHIỆP : SỞ KHOA HỌC CÔNG NGHỆ TỈNH ĐỒNG NAI

ENTERPRISE TRAINING: DONG NAI DEPARTMENT OF SCIENCE AND TECHNOLOGY.

HÌNH ẢNH TẬP HUẤN LỚP SHAREPOINT WORKFLOW VÀ KIẾN TRÚC SHAREPOINT

PHOTOS OF SHAREPOINT WORKFLOW AND ARCHITECTURE CLASS.

HÌNH ẢNH TẬP HUẤN LỚP SHAREPOINT WORKFLOW VÀ KIẾN TRÚC SHAREPOINT

PHOTOS OF SHAREPOINT WORKFLOW AND ARCHITECTURE CLASS.

Friday, March 2, 2012

Lesson 03: How to make Reporting Services Connect Sharepoint List


In this article, you will know how to create SSRS connect to Sharepoint List.

Step 1: Click Start | SQL Server Business Intelligence Development Studio
Step 2: Choose Report Server Template and named is SSRSConnectSharepointList
Step 3: Right click Report | Click Add New Report
Step 4: Add new data source, in combobox Type choose “Microsoft Sharepoint List”
Step 5: Connection string: enter your web application then click Next
Step 6: Click button Query builder…
Step 7: Choose Table name then click OK
Step 8: Click Next
Step 9: Set default then click Next
Step 10: Choose column and click Details> button then click Next
Step 11: Set default then click Next
Step 12: Enter Report name is: HistoryCall | Check to Preview report and click Finish
Step 13: Result below
Step 14: Right click to HistoryCall.rdl | View code
Step 15: Find to code here
Step 16: This is code general when configure Reporting (Default), you must add similar below
<DataSource Name="DataSource1">
      <ConnectionProperties>
        <DataProvider>SHAREPOINTLIST</DataProvider>
        <ConnectString>http://quochung-acer</ConnectString>
        <IntegratedSecurity>true</IntegratedSecurity>
      </ConnectionProperties>
      <rd:SecurityType>Integrated</rd:SecurityType>
      <rd:DataSourceID>007a7ef9-ff7e-4106-a0ca-80e26af81c28</rd:DataSourceID>
</DataSource>
Step 17: Open your site | choose list library Shared Documents and Uploaded File | choose file to HistoryCall.rdl
Step 18: Result, HistoryCall added to here
Step 19: Back to Home page
Step 20: Click Site Actions | Edit Page
Step 21: Cick tab Insert | Web Part
Step 22: In categories | choose SQL Server Reporting | SQL Server Reporting Services …
Step 23: Click “Click here to open the tool panel” link
Step 28: Click button OK
Step 29: Click Save and Close Icon, Result below
Step 30: Go to home | click to List Shares Documents | click to HistoryCall.rdl directly 
Step 31: Result below

Lesson 04: How to custom design and configuration SSRS


Step 1: Click Start | SQL Server Business Intelligence Development Studio | Choose Report Server Template and named is CustomDesignSSRS
Step 2: Right click Report | Click Add New Report
Step 3: Add new data source
In combobox Type choose “Microsoft Sharepoint List”
Connection string: enter your web application then click Next
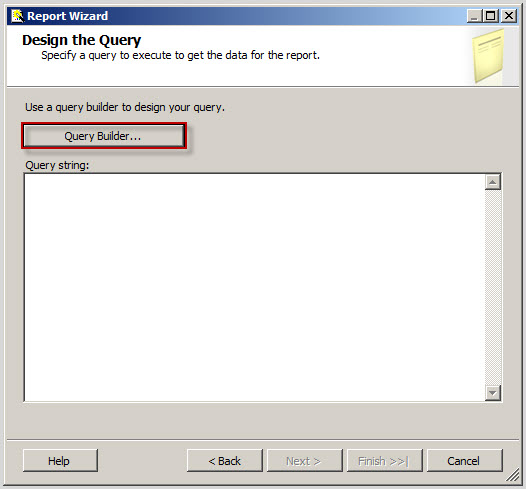
Step 4: Click button Query builder…
Step 5: Choose Table name then click icon Filter and Filter with your condition | OK
Step 6: Click Next
Step 7: Choose Report type is Matrix then click Next
Step 8: Choose fields as then click Next
Step 9: Set default then click Next
Step 10: Enter Report name is: ReportTask | Check to Preview report and click Finish
Step 11: Result as
You can enter value into textbox and click button View Report
Step 12: Design report by right click in range contain report | Insert | Table
Step 13: Merge cells
Step 14: Design Finish, result as
Step 15: Add value of Fields by expand Datasets | Dataset1 | Drag and drop field to User Interface (UI)
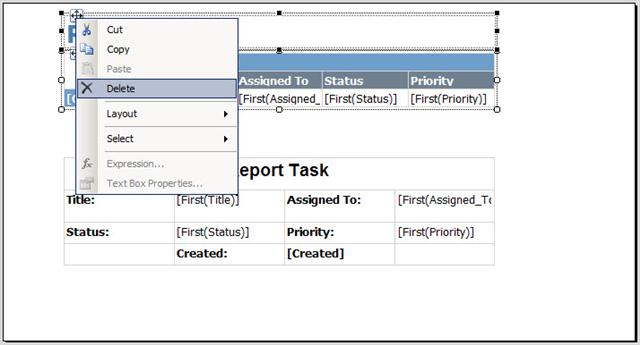
Step 16: Delete old UI
Step 17: Result as
Step 18: Click tab Preview and enter value then click View Report, result as
Step 18: Open your Web Application and upload ReportTask.rdl to list library “Shared Documents “
Step 19: Click to ReportTask and if see error
Step 20: Error because Reporting configure with External database (Instance MSSQLServer) but do not configure with Instance Sharepoint (Sharepoint Foundation)
Step 21: Configure again by choose Instance SHAREPOINT and click Connect
Step 22: Click to “Web Service URL” link and change port number to 81 (configure above step 3)
Step 23: Click to “Report Manager URL” link and click Edit change port number to 81 (configure above step 3)
Step 24: Configure successful
Step 25: Run URLs as
Step 26: Go to Central Admin | General Application Settings | Reporting Services Integration then configure as
Step 27: Configuration successful
Step 28: Back to your site and refresh page error, enter value and click Apply result as
Step 29: Add Web Part as