ĐÀO TẠO DOANH NGHIỆP : SỞ KHOA HỌC CÔNG NGHỆ TỈNH ĐỒNG NAI

ENTERPRISE TRAINING: DONG NAI DEPARTMENT OF SCIENCE AND TECHNOLOGY.

HÌNH ẢNH TẬP HUẤN LỚP SHAREPOINT WORKFLOW VÀ KIẾN TRÚC SHAREPOINT

PHOTOS OF SHAREPOINT WORKFLOW AND ARCHITECTURE CLASS.

HÌNH ẢNH TẬP HUẤN LỚP SHAREPOINT WORKFLOW VÀ KIẾN TRÚC SHAREPOINT

PHOTOS OF SHAREPOINT WORKFLOW AND ARCHITECTURE CLASS.

Showing posts with label Configuration Sharepoint. Show all posts

Monday, May 7, 2012

How to create Site Collection in a specific Content Database


Add a new Content Database using Central Administration > Application Management > Content Databases > Add Content Database:
Type Database Name

NOTE! Make sure ”Maximum numbers of sites that can be created in this database” minus ”Current number of Sites” equals the largest number in which you want to add the new Site Collection:


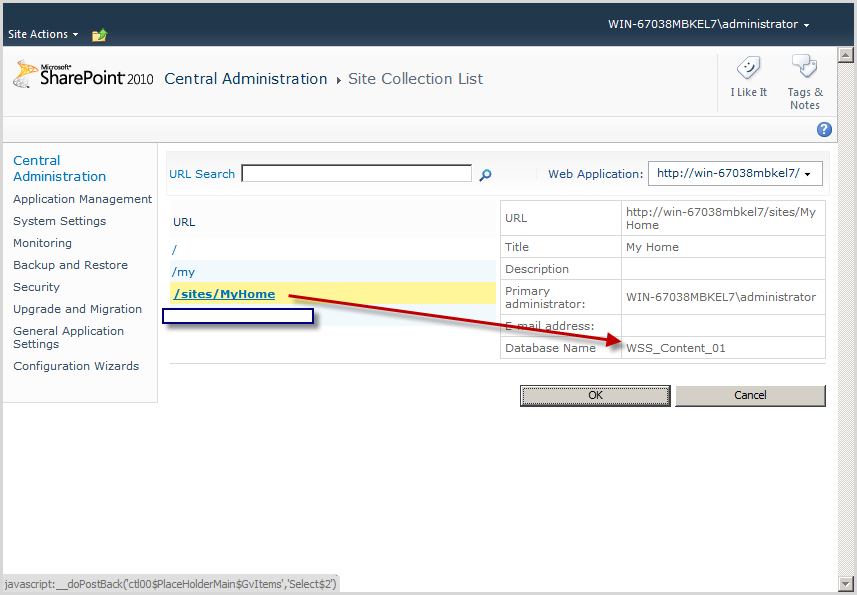
View all site collection using Central Administration > Application Management > View all site collections  then you see root Web with WWS_Content database

And see /my (My Site) with WWS_Content database too

Go ahead and create a new Site Collection:
Title: My Home
URL: /sites/MyHome

Go back to the Content Database overview to see that the new Site Collection has been created in the new Content Database:

You can change “Number of sites before a warning event is generated” and “Maximum number of sites that can be created in this database” to make sure new Site Collections are added to the correct content database by click to WWS_Content_01 then edit
“Number of sites before a warning event is generated”: 1
Maximum number of sites that can be created in this database”: 2

“Number of sites before a warning event is generated” and “Maximum number of sites that can be created in this database” is changed

View all site collection using Central Administration > Application Management > View all site collections  then you will see new site collection with another content database

Creating site collection templates


In the article “How to create Site Collection in a specificContent Database” have a site collection was created is MyHome.
Go to Site > Site Actions > Click to Save site as template at Site Actions category
Type File name: MyHome, Template name: MyHome then click OK
Then save site as template successful, download that template and save to C:/ driver
Create site collection from template using Central Admin > Application Management > Create site collections
Title: My Home Template
URL: /sites/MyHomeTemplate
Select a template: <Select template later… > ! Important
Click to “Solution Gallery” link
Upload template “MyHome.wsp” in C:\ driver to solution then Active it
Go back before page you will see tab custom appear with template “MyHome” then click OK

At Visitors to this site: Use an existing group
Member of this site: Use an existing group
Owner of this site: Use an existing group
Then click OK
Result new site collection is created successful from template

Thursday, April 26, 2012

SharePoint 2010 Ratings


Open your list (Custom List, Lirary …) | Settings
Click to Ratinng settings
Choose yes
Done rating

Sharepoint 2010 anonymous access


Go to Central  Admin | click to “Manage web applications” link then click to your web application – On ribbon choose Icon Authentication Provides  (Image 35)
Dialog appear, click to “Default” link
Check to “Enable anonymous access”
Back to list your application, on you web application choose Icon Anonymous Policy on ribbon
In anonymous User Policy:  choose radio button “None - policy”
Go to your web application
Site Actions | Site Settings | Site Permissions
On ribbon click Icon Anonymous Access
In Anonymous user can access: choose “Entire Web site”

Wednesday, February 29, 2012

Article 2 : Add Sharepoint View to webpart page


Trong bài viết này bạn có thể đưa ra 1 giải pháp cho việc hiển thị view được chỉ định trên webpart. / In this article you can offer a solution to display the selected view on webpart.
Step 1: Tạo mới Webpart page tên WebPartToSharepointView.aspx / Create new Web Part page name WebPartToSharepointView.aspx
Step 2: Đi đến Task List và nhập mới dữ liệu trên view All Tasks (mặc định). / Go to the Task List and enter new data on the All Tasks view (default)
Step 3: Tạo mới View tên View1 và Filter Title với giá trị là View1. / Create new View name View1 and Filter Title with value is View1
Step 4: Tạo mới View tiếp theo tên View2 và Filter Title với giá trị là View2./  Create new View name View2 and Filter Title with value is View2
Step 5: Tạo mới View tiếp theo tên View3 và Filter Title với giá trị là View3./  Create new View name View3  and Filter Title with value is View3
Step 6: Quay về WebPart page và add new webpart trong Categories chọn Lists and Libraries | Tasks sau đó click Add./ Go back to WebPart page and  add new webpart, in Categories choose Lists and Libraries | Tasks then click Add
Step 7: Edit Webpart
Step 8: Thay đổi Title từ Task thành View1 và chọn View1 từ DropDownList “Select View”. / Change Title from Task to View1 and select View1 from DropDownList “Select View”
Step 9: Kết quả như sau. / Result as follows
Step 10: Tiếp tục add new webpart ./ Continue add new webpart
Step 11: Thay đổi Title thành View2 và chọn View2 từ DropDownList “Select View”./ Continue c hange Title from Task to View2 and select View2 from DropDownList “Select View”
Step 12: Tiếp tục add new webpart tới Tasks List và thay đổi Title thành View3  và chọn View3 từ DropDownList “Select View”. / Continue change Title from Task to View3 and select View3 from DropDownList “Select View”


Step 13: Kết quả như sau. / Result as follows
Step 14: Save và Exit, bạn thấy được 3 view khác nhau được add lên webpart page./ Save and Exit, you see 3 diffirent views added to webpart page

Article 1: Creating Calculated Column Formulas Using Excel


Chào các bạn, Field Calculated trong sharepoint có nhiều ưu điểm về tính toán cho ra kết quả từ những giá trị khác, cũng giống như Excel các bạn hoàn toàn có thể dung công thức của Excel để tính toán và copy vào Formula của Field Calculated và đổi lại tên Field cho phù hợp.  /
 Hello everyone, Calculated Field in Sharepoint has many advantages for the results calculated from other values, like Excel you can fully use of Excel formulas to calculate and copy of the Formula Calculated Field and renamed Field to match
Sau đây là 1 ví dụ điển hình: Nếu Quantity < 10 thì lấy 100% và ngược lại lấy 80% sau đó có kết quả nhân với Quantity và Price. Như thế với Excel thì quá dễ, dưới đây là công thức mô tả sau khi đã tính toán từ Excel copy vào đây. /
Here's an example: If Quantity <10 then take 100% and if not take 80%, then get result the Quantity * Price. How to Excel is easy, here is the formula described after calculation from Excel copy here
Step 1: Mở Excel và thiết kế như sau / Open Excel and design as follows:
Step 2: Xây dựng công thức với hàm if / Build formula with IF function:
Step 3: Công thức như sau / formula as follows:
Step 4: Kết quả như sau và kéo chuột cho ô bên dưới được áp dụng công thức / Result as follows and drag mouse cell below to formula applied:
Step 5: Kết quả như sau / Result as follows:
Step 6: Mở Sharepoint web application của bạn và tạo mới list tên CalculatedColumnsDemo (tuỳ ý) / Open your Sharepoint web application and create a new list CalculatedColumnsDemo (optional)
ü  Tạo mới Field: Quantity, kiểu dữ liệu là Number / Create a new Field:  Quantity, Data Type is Number
ü  Tạo mới Field: Price , kiểu dữ liệu là Number/ Create a new Field:  Price, Data Type is Number
ü  Tạo mới Field: Amount, kiểu dữ liệu là Calculated / Create a new Field:  Amount, Data Type is Calculated
ü  Bạn copy công thức từ Excel và paste vào formular của field Amount “=IF(A2<10,100%,80%)*A2*B2” và thay đổi tên Field cho phù hợp “=IF(Quantity<10,100%,80%)*Quantity*Price” / You copy a formula from Excel and paste into Formula  of the field  Amount “=IF(A2<10,100%,80%)*A2*B2” and change name  of Field appropriate “=IF(Quantity<10,100%,80%)*Quantity*Price”
Step 7: Bạn thử nhập mới 1 vài dữ liệu và kết quả như sau / You try a few new input data and results are as follows