ĐÀO TẠO DOANH NGHIỆP : SỞ KHOA HỌC CÔNG NGHỆ TỈNH ĐỒNG NAI

ENTERPRISE TRAINING: DONG NAI DEPARTMENT OF SCIENCE AND TECHNOLOGY.

HÌNH ẢNH TẬP HUẤN LỚP SHAREPOINT WORKFLOW VÀ KIẾN TRÚC SHAREPOINT

PHOTOS OF SHAREPOINT WORKFLOW AND ARCHITECTURE CLASS.

HÌNH ẢNH TẬP HUẤN LỚP SHAREPOINT WORKFLOW VÀ KIẾN TRÚC SHAREPOINT

PHOTOS OF SHAREPOINT WORKFLOW AND ARCHITECTURE CLASS.

Sunday, December 8, 2013

OFFICE 365 Add Domain

Login to “https://portal.microsoftonline.com/” click to Addin >> Office 365
Click to domains
Click Add a domain
Choose “Start step 1” button
Input you domain “msvndemo37.com” then click Next
Choose General instructions
Copy 2 record (TXT, MX) to notepad to add into domain msvndemo37.com
Access to CPanel https://access.pavietnam.vn/login.php to manage domain “msvndemo37.com”
Input Domain and Password
Here is default screen of DNS management
Insert 2 records and click “Save Configuration”
Go back screen of OFFICE 365 then click “done, verify now”
Click Finish
Click to start step 2
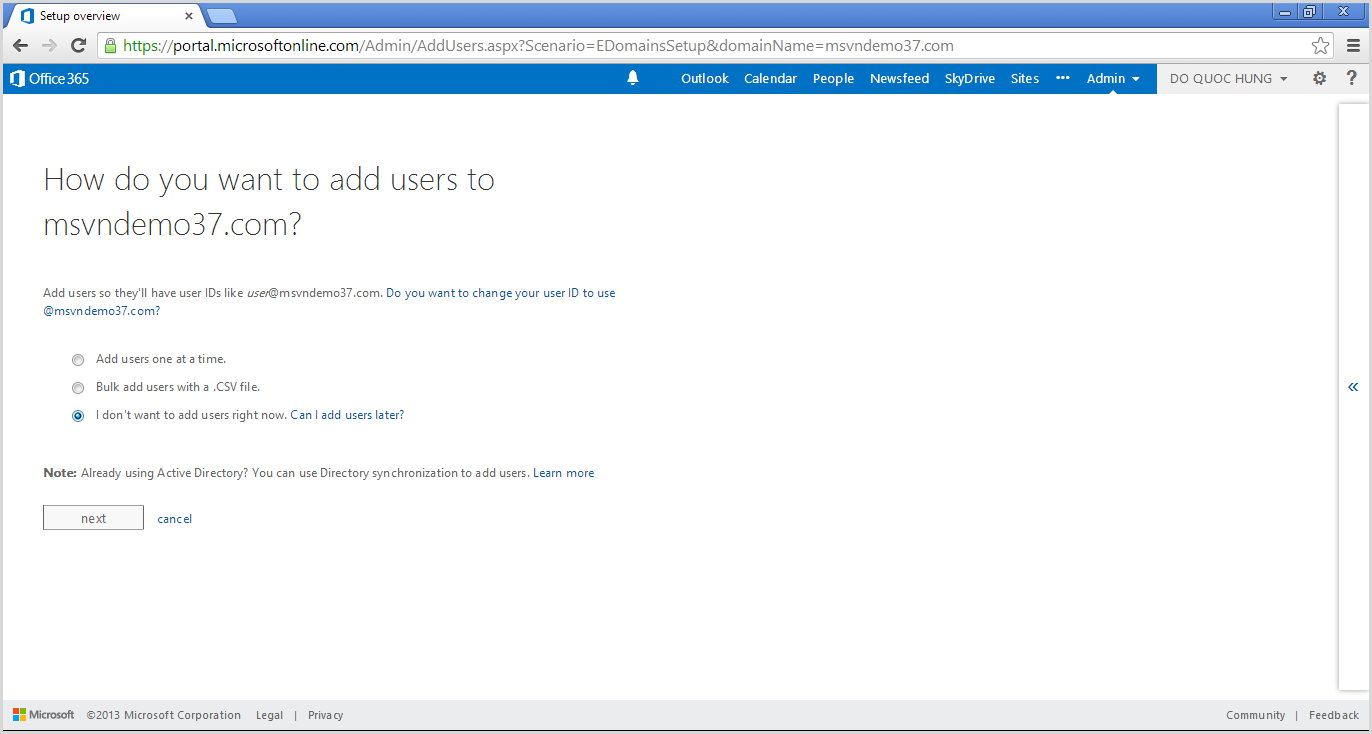
Choose “I don't want to add users right now”  then click Next
Click “Start step 3” button
Don’t change and click Next
Copy 3 records into notepad
Go back CPanel and insert 3 rows like this then Save Configuration
Continue go back screen of office 365 copy 5 records into notepad
Go back CPanel and insert 5 rows like this then Save Configuration
Go back screen of Office 365 and click “Done, go check”
Click Finish
We had finished the domain configuration for Exchange and Lync
We will implement for publish sharepoint site by click “Add a domain”
Similar to Exchange and Lync => click start step 1
Input your domain, don’t forget www. Then click Next
Click Finish
Click to start step 2
Configuring like image then click Next
Click start step 3
Choose Sharepoint Online then click Next
Click to “Open the link”
Click to Publish site
Click to “Share”
Input Everyone then click share
Website is shared with Everyone
Click to “Make Website Online”
Go back screen of office 365 then click Next
And click Next
Click Next
Click  Next
Click Next (After click next, remember do follow the step)
Click “Done, go check”
Click finish
Go to Admin >> Sharepoint
Choose website then click Website Domain
Choose your custom domain then click OK
Waiting change name of domain
The old domain is deleted

F5 to refresh page and see new domain is applied
Copy the publish website link and paste to here, click Save Configuration
Try to access the link http://www.msvndemo37.com/


Saturday, December 7, 2013

OFFICE 365 Registration

Access to the website http://office.microsoft.com/en-001/. Click to Tab “For business” => click to Discover more >
Here is page for Business
Click “Compare plan”
Choose Office 365 Enterprise E3 then click Free trial
Input your information
Choose “Send text message” to your mobile phone number
Add Code form mobile phone text message to “Verification code” then click Create my account
Finish your registration
Waiting for services will be commpled

Good luck!

Sunday, December 1, 2013

sharepoint 2010 cascadingdropdown jquery

Download JS and Script at Here
Create custom list with name is Region (Title=>Default)
Create custom list States (Title=> Default, Region => lookup to Regions list)
Create custom list CascadeDemo (Title=> Default, Region => lookup to Regions list, State => lookup to States list)
Note: Should not change internal name of field Region and State (!Important)
Go to list CascadeDemo => list setting >> Advanced Setting >> at Launch forms in a dialog and choose No

Upload 2 jquery libraries to Shared Documents (you can download at here)
At forn NewForm.aspx of CascadeDemo add content editor webpart then click Edit HTML Source follow the image
Input the code like this
<script language="javascript" type="text/javascript" src="/Shared%20Documents/jquery-1.8.2.min.js"></script>
<script language="javascript" type="text/javascript" src="/Shared%20Documents/jquery.SPServices-0.7.2.min.js"></script>
<script language="javascript" type="text/javascript">
$(document).ready(function() {
            // Set up the cascade from Region to State
            $().SPServices.SPCascadeDropdowns({
                        listName: "CascadeDemo",
                        relationshipList: "States",
                        relationshipListParentColumn: "Region",
                        relationshipListChildColumn: "Title",
                        relationshipListSortColumn: "Title",
                        parentColumn: "Region",
                        childColumn: "State"
            });
});

</script>
The result as
And
Finish