ĐÀO TẠO DOANH NGHIỆP : SỞ KHOA HỌC CÔNG NGHỆ TỈNH ĐỒNG NAI

ENTERPRISE TRAINING: DONG NAI DEPARTMENT OF SCIENCE AND TECHNOLOGY.

HÌNH ẢNH TẬP HUẤN LỚP SHAREPOINT WORKFLOW VÀ KIẾN TRÚC SHAREPOINT

PHOTOS OF SHAREPOINT WORKFLOW AND ARCHITECTURE CLASS.

HÌNH ẢNH TẬP HUẤN LỚP SHAREPOINT WORKFLOW VÀ KIẾN TRÚC SHAREPOINT

PHOTOS OF SHAREPOINT WORKFLOW AND ARCHITECTURE CLASS.

Showing posts with label Sharepoint 2013 online. Show all posts

Monday, December 9, 2013

OFFICE 365 - Sharepoint 2013 Online

OFFICE 365 - Sharepoint 2013 Online
  • Lesson 01: OFFICE 365 Registration (sharepoint 2013 online)
  • Lesson 02: OFFICE 365 Add Domain (sharepoint 2013 online)
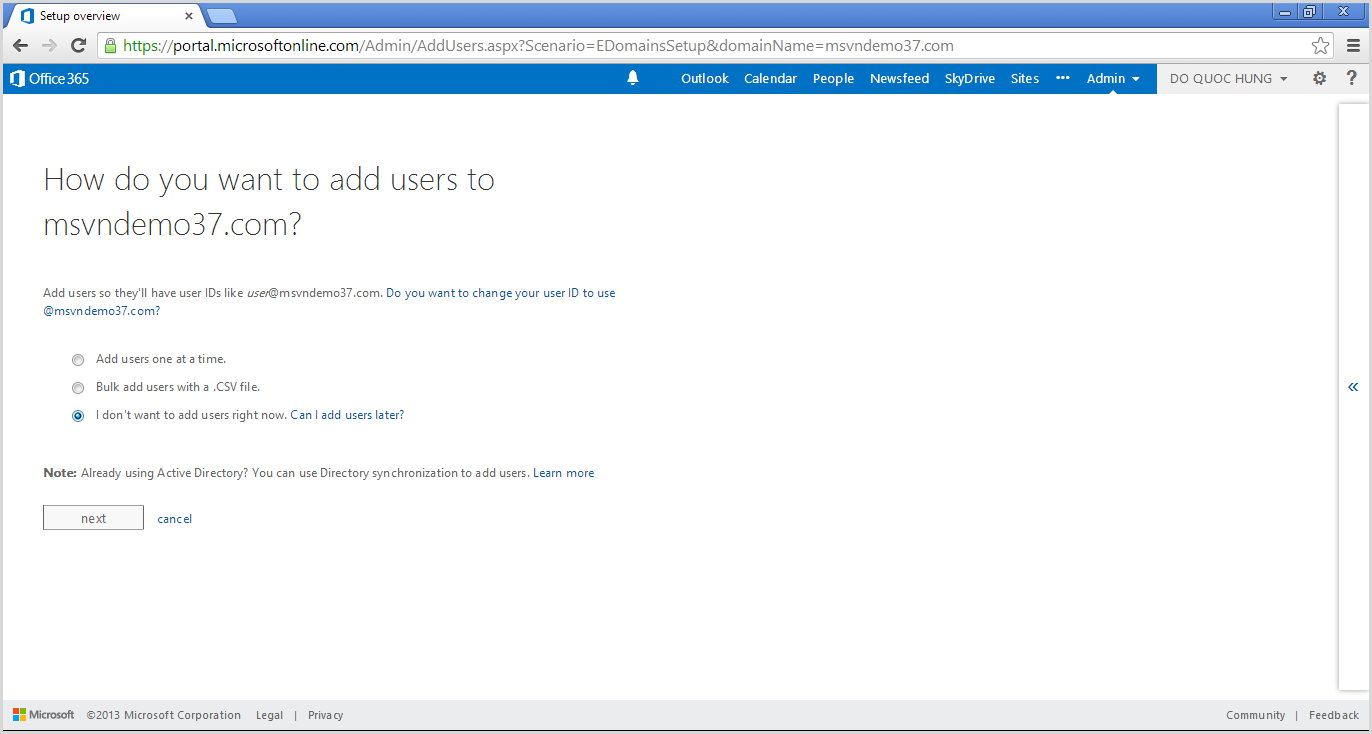
  • Lesson 03: OFFICE 365 Create user (sharepoint 2013 online)
  • Lesson 04: Get started with office 365 (sharepoint 2013 online)
  • Lesson 05: Manage Admin site of sharepoint 2013 online
  • Lesson 06: Branding sharepoint 2013 online - custom master page for using design manager
  • Lesson 07: Find Number of Users Currently Logged on to a SharePoint Site (SP 2013 Online)
  • Lesson 08:Sharepoint 2013 Online: Attach file to sharepoint list item by sandbox

Sunday, December 8, 2013

OFFICE 365 Add Domain

Login to “https://portal.microsoftonline.com/” click to Addin >> Office 365
Click to domains
Click Add a domain
Choose “Start step 1” button
Input you domain “msvndemo37.com” then click Next
Choose General instructions
Copy 2 record (TXT, MX) to notepad to add into domain msvndemo37.com
Access to CPanel https://access.pavietnam.vn/login.php to manage domain “msvndemo37.com”
Input Domain and Password
Here is default screen of DNS management
Insert 2 records and click “Save Configuration”
Go back screen of OFFICE 365 then click “done, verify now”
Click Finish
Click to start step 2
Choose “I don't want to add users right now”  then click Next
Click “Start step 3” button
Don’t change and click Next
Copy 3 records into notepad
Go back CPanel and insert 3 rows like this then Save Configuration
Continue go back screen of office 365 copy 5 records into notepad
Go back CPanel and insert 5 rows like this then Save Configuration
Go back screen of Office 365 and click “Done, go check”
Click Finish
We had finished the domain configuration for Exchange and Lync
We will implement for publish sharepoint site by click “Add a domain”
Similar to Exchange and Lync => click start step 1
Input your domain, don’t forget www. Then click Next
Click Finish
Click to start step 2
Configuring like image then click Next
Click start step 3
Choose Sharepoint Online then click Next
Click to “Open the link”
Click to Publish site
Click to “Share”
Input Everyone then click share
Website is shared with Everyone
Click to “Make Website Online”
Go back screen of office 365 then click Next
And click Next
Click Next
Click  Next
Click Next (After click next, remember do follow the step)
Click “Done, go check”
Click finish
Go to Admin >> Sharepoint
Choose website then click Website Domain
Choose your custom domain then click OK
Waiting change name of domain
The old domain is deleted

F5 to refresh page and see new domain is applied
Copy the publish website link and paste to here, click Save Configuration
Try to access the link http://www.msvndemo37.com/