


How to create Infopath Form for Direct Manager Approve
+using+Visual+Studio+2010+_+01.png)
+using+Visual+Studio+2010+_+02.png)
+using+Visual+Studio+2010+_+03.png)
+using+Visual+Studio+2010+_+04.png)
+using+Visual+Studio+2010+_+05.png)
+using+Visual+Studio+2010+_+06.png)
+using+Visual+Studio+2010+_+07.png)
+using+Visual+Studio+2010+_+08.png)
+using+Visual+Studio+2010+_+08_01.png)
+using+Visual+Studio+2010+_+08_02.png)
+using+Visual+Studio+2010+_+08_03.png)
+using+Visual+Studio+2010+_+08_04.png)
+using+Visual+Studio+2010+_+08_05.png)
+using+Visual+Studio+2010+_+08_06.png)
+using+Visual+Studio+2010+_+08_07.png)
+using+Visual+Studio+2010+_+10.png)
+using+Visual+Studio+2010+_+11.png)
+using+Visual+Studio+2010+_+14.png) File | Publish | Network Location
File | Publish | Network Location
+using+Visual+Studio+2010+_+15.png)
Open Infopath Form Designer
File | New | Blank
Form | Design Form
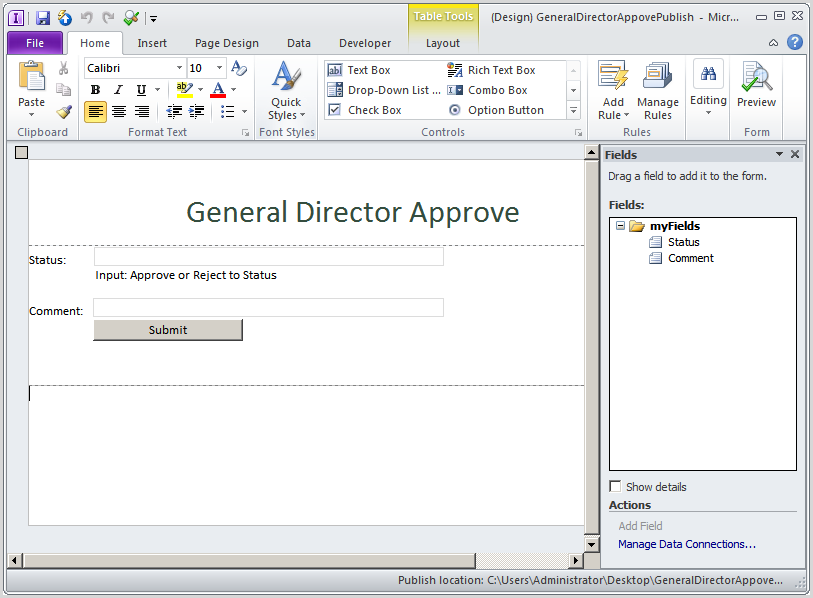
Design UI as follows:
Right click field1 | Text Box Properties…| change Field name
is Status
Right click field2 | Text Box Properties…
Change Field name is
Right click to button | Button Properties…
Change label: Submit
UI after is changed as follows
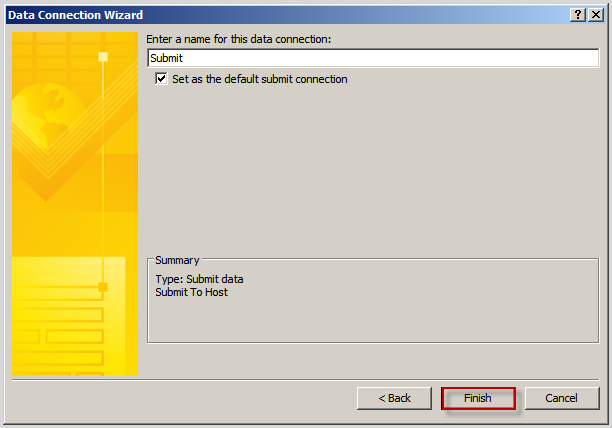
Click to button Submit | On ribbon choose Add Rule | When
this button is clicked | Submit data
At rule Details Box | Add
At Data Connection Wizard Choose | Create a new connection
to: | Submit data then click Next
Choose radio “To the hosting environment , …” then click
Next
Click Finish
Click OK
Rename for this rule is Submit Rule
Continue, click to button Submit | On ribbon | Add Rule |
When this button is clicked | Close Form (Image 10)
Click OK
Rename for this rule is Close Rule
+using+Visual+Studio+2010+_+12.png)
File | click to Form Options
+using+Visual+Studio+2010+_+13.png)
At Category | Security and Trust | uncheck Automatically
determine … | choose Domain (…)
Remember check to “Sign this form template” and click Create
Certificate … if have not any
certificate
File | Publish | Network Location
Save this template
+using+Visual+Studio+2010+_+16.png)
Continue , click Browse… to publish this template
+using+Visual+Studio+2010+_+17.png)
Save this publish template
+using+Visual+Studio+2010+_+18.png)
Click Next
+using+Visual+Studio+2010+_+19.png)
Clear all text in textbox then click next
+using+Visual+Studio+2010+_+20.png)
Click OK when Warning
+using+Visual+Studio+2010+_+21.png)
Click Publish
+using+Visual+Studio+2010+_+22.png)
Click Close
+using+Visual+Studio+2010+_+23.png)
File | Form Template Properties
+using+Visual+Studio+2010+_+24.png)
Copy ID of Form as follows:
+using+Visual+Studio+2010+_+25.png)
Save this ID to notePad
urn:schemas-microsoft-com:office:infopath:GeneralDirectorAppove:-myXSD-2012-03-23T08-37-10
+using+Visual+Studio+2010_Part2+_+01.png)
+using+Visual+Studio+2010_Part2+_+02.png)
+using+Visual+Studio+2010_Part2+_+03.png)
+using+Visual+Studio+2010_Part2+_+04.png)
+using+Visual+Studio+2010_Part2+_+05.png)
+using+Visual+Studio+2010_Part2+_+06.png)
+using+Visual+Studio+2010_Part2+_+07.png)
+using+Visual+Studio+2010_Part2+_+08.png)
+using+Visual+Studio+2010_Part2+_+09.png)
+using+Visual+Studio+2010_Part2+_+10.png)
+using+Visual+Studio+2010_Part2+_+11.png)
+using+Visual+Studio+2010_Part2+_+12.png)
+using+Visual+Studio+2010_Part2+_+13.png)
+using+Visual+Studio+2010_Part2+_+14.png)
+using+Visual+Studio+2010_Part2+_+15.png)
+using+Visual+Studio+2010_Part2+_+16.png)
+using+Visual+Studio+2010_Part2+_+17.png)
+using+Visual+Studio+2010_Part2+_+18.png)
+using+Visual+Studio+2010_Part2+_+19.png)
+using+Visual+Studio+2010_Part2+_+20.png)
+using+Visual+Studio+2010_Part2+_+21.png)
+using+Visual+Studio+2010_Part2+_+22.png)
+using+Visual+Studio+2010_Part2+_+23.png)
+using+Visual+Studio+2010_Part2+_+24.png)
+using+Visual+Studio+2010_Part2+_+25.png)
+using+Visual+Studio+2010_Part2+_+26.png)
+using+Visual+Studio+2010_Part2+_+27.png)
+using+Visual+Studio+2010_Part2+_+28.png)
+using+Visual+Studio+2010_Part2+_+29.png)
+using+Visual+Studio+2010_Part2+_+30.png)