Update window first if you did not update before.
Go to this link” https://go.microsoft.com/?linkid=9737537”
to download Web Platform Installer 5.0.

Install Web Platform Installer 5.0
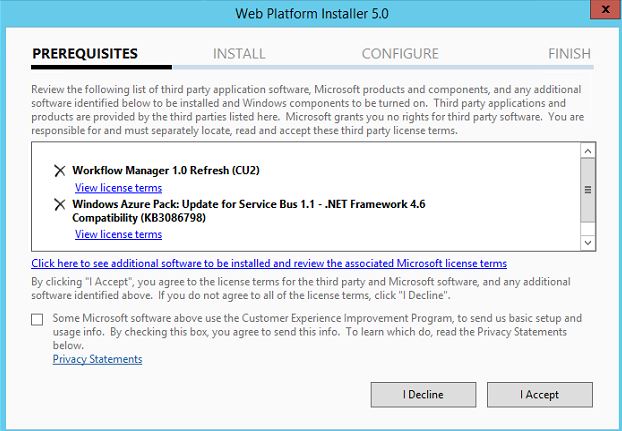
Open Web Platform Installer 5.0
Type Workflow Manager
on top right hand.
Click Add on the Workflow manager 1.0 Refresh (CU2) and
Click Install.

Click I Accept
Check the I don’t Want to user Microsoft Update and click
Continue

Waiting and Finish

Cancel the Wizard and type Workflow Manager on top right
hand. Click Add Workflow Manager 1.0 Cumulative Update 3 and then Click Install

Waiting and finish. We will check all of them installed in
grogram of windows

Go to Start and on top Right click on Search Icon and Type
the Workflow Manager Configuration in the Search Box and click it.

On Workflow Manager Configuration page, Please provide the
below information
1.
SQL Server Instance
2.
Database Name

Other Database name provided automatically
Input user name and password of farm admin

Check to Auto-generate
Input certificate generation key
Port number => keep default

Check to Allow Workflow management over HTTP on this
Computer

On the Service Bus Configuration Page, Please Provide the
following information
1.
SQL SERVER INSTANCE
2.
Database name keep default

Continue
Check to "Use the Same Service Account credentials as
provided for Workflow Manager”
Check to Auto-generate
Check to Use the same certificate generation key as provided
for workflow manager

Keep default page

And finish configuration

Here is configuration information
Configuration for Workflow Manager
Management Database SQL Instance SQL2014
Enable SSL connection with SQL Server instance False
Authentication Windows
Authentication
Management Database Name WFManagementDB
Instance Management Database SQL Instance SQL2014
Enable SSL connection with SQL Server instance False
Authentication Windows
Authentication
Instance Management Database Name WFInstanceManagementDB
Resource Management Database SQL Instance SQL2014
Enable SSL connection with SQL Server instance False
Authentication Windows
Authentication
Resource Management Database Name WFResourceManagementDB
RunAs Account SWISSITBRIDGE\spfarm
RunAs Password ***********
Certificate Generation Key ***********
Workflow Manager Outbound Signing Certificate Auto-generated
Service SSL Certificate Auto-generated
Encryption Certificate Auto-generated
Workflow Manager Management Port 12290
HTTP Port 12291
Enable firewall rules on this computer True
Administrators Group BUILTIN\Administrators
Configuration for Service Bus
Management Database SQL Instance SQL2014
Enable SSL connection with SQL Server instance False
Authentication Windows
Authentication
Management Database Name SbManagementDB
Gateway Database SQL Instance SQL2014
Enable SSL connection with SQL Server instance False
Authentication Windows
Authentication
Gateway Database Name SbGatewayDatabase
Message Container SQL Instance SQL2014
Enable SSL connection with SQL Server instance False
Authentication Windows
Authentication
Message Container Database Name SBMessageContainer01
RunAs Account SWISSITBRIDGE\spfarm
RunAs Password ***********
Certificate Generation Key ***********
Farm Certificate Auto-generated
Encryption Certificate Auto-generated
HTTPS Port 9355
TCP Port 9354
Message Broker Port 9356
Internal Communication Port Range 9000 - 9004
Enable firewall rules on this computer True
Administrators Group BUILTIN\Administrators
//////////////// ===> And Powershell script to configure workflow manager ===/////////////
# To be run in Workflow Manager PowerShell console that has
both Workflow Manager and Service Bus installed.
# Create new SB Farm
$SBCertificateAutoGenerationKey = ConvertTo-SecureString
-AsPlainText -Force -String '***** Replace with Service Bus
Certificate Auto-generation key ******' -Verbose;
New-SBFarm -SBFarmDBConnectionString 'Data Source=SQL2014;Initial
Catalog=SbManagementDB;Integrated Security=True;Encrypt=False'
-InternalPortRangeStart 9000 -TcpPort 9354 -MessageBrokerPort 9356
-RunAsAccount 'SWISSITBRIDGE\spfarm' -AdminGroup 'BUILTIN\Administrators'
-GatewayDBConnectionString 'Data Source=SQL2014;Initial
Catalog=SbGatewayDatabase;Integrated Security=True;Encrypt=False'
-CertificateAutoGenerationKey $SBCertificateAutoGenerationKey
-MessageContainerDBConnectionString 'Data Source=SQL2014;Initial
Catalog=SBMessageContainer01;Integrated Security=True;Encrypt=False' -Verbose;
# To be run in Workflow Manager PowerShell console that has
both Workflow Manager and Service Bus installed.
# Create new WF Farm
$WFCertAutoGenerationKey = ConvertTo-SecureString
-AsPlainText -Force -String '***** Replace with Workflow Manager
Certificate Auto-generation key ******' -Verbose;
New-WFFarm -WFFarmDBConnectionString 'Data
Source=SQL2014;Initial Catalog=WFManagementDB;Integrated
Security=True;Encrypt=False' -RunAsAccount 'SWISSITBRIDGE\spfarm' -AdminGroup
'BUILTIN\Administrators' -HttpsPort 12290 -HttpPort 12291
-InstanceDBConnectionString 'Data Source=SQL2014;Initial
Catalog=WFInstanceManagementDB;Integrated Security=True;Encrypt=False'
-ResourceDBConnectionString 'Data Source=SQL2014;Initial Catalog=WFResourceManagementDB;Integrated
Security=True;Encrypt=False' -CertificateAutoGenerationKey
$WFCertAutoGenerationKey -Verbose;
# Add SB Host
$SBRunAsPassword = ConvertTo-SecureString -AsPlainText -Force
-String '***** Replace with RunAs Password for Service Bus ******'
-Verbose;
Add-SBHost -SBFarmDBConnectionString 'Data
Source=SQL2014;Initial Catalog=SbManagementDB;Integrated
Security=True;Encrypt=False' -RunAsPassword $SBRunAsPassword
-EnableFirewallRules $true -CertificateAutoGenerationKey $SBCertificateAutoGenerationKey
-Verbose;
Try
{
# Create new SB
Namespace
New-SBNamespace
-Name 'WorkflowDefaultNamespace' -AddressingScheme 'Path' -ManageUsers
'SWISSITBRIDGE\spfarm','spfarm@SWISSITBRIDGE' -Verbose;
Start-Sleep -s 90
}
Catch [system.InvalidOperationException]
{
}
# Get SB Client Configuration
$SBClientConfiguration = Get-SBClientConfiguration
-Namespaces 'WorkflowDefaultNamespace' -Verbose;
# Add WF Host
$WFRunAsPassword = ConvertTo-SecureString -AsPlainText -Force
-String '***** Replace with RunAs Password for Workflow Manager ******'
-Verbose;
Add-WFHost -WFFarmDBConnectionString 'Data
Source=SQL2014;Initial Catalog=WFManagementDB;Integrated
Security=True;Encrypt=False' -RunAsPassword $WFRunAsPassword
-EnableFirewallRules $true -SBClientConfiguration $SBClientConfiguration
-EnableHttpPort
-CertificateAutoGenerationKey $WFCertAutoGenerationKey -Verbose;
Waiting configuration progress

And finish progress

Login to server with
farm account.
Open Internet Information Services(IIS)
In the Internet Manager expands the Sites ( on left-hand
side), Click on Workflow Manager Site and On right-Hand side under Actions
click on Bindings

On this Page, Select Https and Click on Edit
On this Page Under the SSL Certificate, click on View
certificates
On this page click on Details tab
On this page Click Copy to File

On Welcome to the certificate Export Wizard Click Next

On Export Private Key page Please Select, No, Do not export
the private key and click Next

On export File Format page, Select Der encoded binary
X.509(.cer) and click Next

On File to export page, Please select the path where
certificate will be save and Click Next

On Completing the Certificate export wizard, Click Finish

You will get message "the export was sucessful".
and click Ok

Import Certificate into SharePoint.
Now Login on the SharePoint Server with Farm Admin account
Open the Central Admin Site
Click on Security and Click on Trust on right-hand side

on Trust Page Click on New
Input Name of the Certificate and browse Path of
Certificate( where you save the certificate)

You will see your certificate added.

Register Workflow Service Proxy
Register-SPWorkflowService -SPSite "http://sp2016"
-WorkflowHostUri "http://sp2016:12291/" –AllowOAuthHttp
Verify from Central Admin:
Go to central admin >> Application Management >
Under Service Application >> Manager Service Application >> click
on Workflow Service Application proxy >> on ribbon click to manage. You
will see the message” Workflow is Connected”

Verify Using the PowerShell:
Open the SharePoint PowerShell console on the SharePoint
Server. Run the Below Command.
Get-SPWorkflowServiceApplicationProxy | Select *

The result is: Open SPD 2013 at left panel click to workflow
and create list workflow you can see popup to choose SharePoint 2013 workflow