


BACKUP
Bạn đăng nhập vào Central Admin và chọn web application cần backup (SharePoint1001)


Chọn web Application (SharePoint1001) và database (SharePoint1001DB) để Backup và chọn Continue to Backup Options

Type of backup: Full
Backup location: đường dẫn lưu (D:\BackupSP =>đã tồn tại hay tạo mới)
Sau đó chọn OK

Trong lúc backup chúng ta đợi trong vài phút tùy theo ứng dụng lớn hay nhỏ.

Sau khi backup thanh công giao diện như sau:

Ta kiểm tra lại web application có bao nhiêu site: Application Management | SharePoint web application Management chọn Content databases

Ta thấy có 2 site và sau khi restore cũng có 2 site thì việc restore thành công

Sau đó giả sử chúng ta mang file Backup đến 1 server khác thì ta delete web application đi và restore lại
Application Management | SharePoint web application Management chọn delete web application

Chọn đúng web application cần xóa
Delete content databases : chon yes
Delete IIS Web sites : chọn yes

Bây giờ chúng ta truy cập vào ứng dụng sẽ không được vì web application đã bị xóa

RESTORE
Chia làm 2 giai đoạn:
- Tạo 1 web application và database có tên giống như tên web application và database đã backup (SharePoint1001 và SharePoint1001DB)
- Restore với lựa chọn là Same configuration
Tạo 1 web application và database có tên giống như tên web application và database đã backup (SharePoint1001 và SharePoint1001DB)
Application Management | SharePoint web application Management chọn Create or extend Web application

Tiếp tục chọn Create a new Web application

Cấu hình như sau :
Chọn Create a new IIS web site | Description : SharePoint1001 (tên giống web application đã backup)
Port: 1001 (giống Port ban đầu)
Application pool name: SharePoint1001Pool
User name: quyền admin
Password: password của admin
Database Name: SharePoint1001DB

Sau khi tạo thành công có giao diên và như sau

Cần reset IIS: nhấn tổ hợp phím window + r và gõ vào hộp thoại : iisreset /noforce và chon OK

Sau khi IIS đươc reset hoàn tất ta bắt đàu Resore:

Chọn đường dẫn đến Folder chứa file Backup và chọn OK


Chọn SharePoint Application vừa mới tạo giống tên với web application đã backup và chọn Continue Restore Process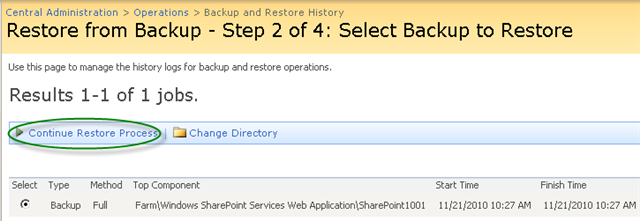

Type of restore: chọn Same configuration
Password: password admin
Và chọn OK

Chúng ta đọi trong giây lát khi ứng dụng đang được restore:

Sau khi restore thành công giao diện như sau:

Chọn web application cần kiểm tra (SharePoint1001):

Ta kiểm tra lại web application có bao nhiêu site: Application Management | SharePoint web application Management chọn Content databases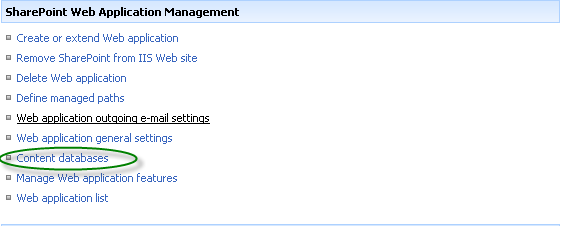
Ta thấy có 2 site và sau khi restore cũng có 2 site thì việc restore thành công

Như vậy ta đã hoàn tất việc Restore webp application.
Truy cập vào lại ứng dụng


