ĐÀO TẠO DOANH NGHIỆP : SỞ KHOA HỌC CÔNG NGHỆ TỈNH ĐỒNG NAI

ENTERPRISE TRAINING: DONG NAI DEPARTMENT OF SCIENCE AND TECHNOLOGY.

HÌNH ẢNH TẬP HUẤN LỚP SHAREPOINT WORKFLOW VÀ KIẾN TRÚC SHAREPOINT

PHOTOS OF SHAREPOINT WORKFLOW AND ARCHITECTURE CLASS.

HÌNH ẢNH TẬP HUẤN LỚP SHAREPOINT WORKFLOW VÀ KIẾN TRÚC SHAREPOINT

PHOTOS OF SHAREPOINT WORKFLOW AND ARCHITECTURE CLASS.

Wednesday, May 9, 2012

How to create Site Collections from a Custom Web Template

Download project at here

How to create Site Collections from a Custom Web Template Programming

Open Visual Studio 2010.

Go to File => New => Project.

Select Empty SharePoint Project template from the installed templates.

Enter the Name “CreateSiteCollectionFromTemplate” and click Ok.

Right click on the solution and click on Add a new item.

Select the VisualWebPart template from the installed template.

Enter the Name as CreateSiteCollectionFromTemplate and click Ok.

Now the entire solution looks like following.


Open CreateSiteCollectionFromTemplateUserControl.ascx then drag and drop button follows as:
Double click to button and add reference:
using Microsoft.SharePoint.Administration;
using Microsoft.SharePoint;
using System.IO;
using System.Linq;

Code in button Button1_Click
using System;
using System.Web.UI;
using System.Web.UI.WebControls;
using System.Web.UI.WebControls.WebParts;
using Microsoft.SharePoint.Administration;
using Microsoft.SharePoint;
using System.IO;
using System.Linq;

namespace CreateSiteCollectionFromTemplate.CreateSiteCollectionFromTemplate
{
    public partial class CreateSiteCollectionFromTemplateUserControl : UserControl
    {
        protected void Page_Load(object sender, EventArgs e)
        {
        }

        protected void Button1_Click(object sender, EventArgs e)
        {
            SPWebApplication spWebApplication = SPWebApplication.Lookup(new Uri("http://devsharepoint/"));
            using (SPSite spSite = spWebApplication.Sites.Add("/sites/HomeTemplate", "SharePoint", null, 1033, null, "administrator", "Administrator", "quochung211187@gmail.com"))
            {
                SPWeb rootWeb = spSite.RootWeb;
                // Get Solutions Gallery
                SPDocumentLibrary spDocumentLibrary = (SPDocumentLibrary)spSite.GetCatalog(SPListTemplateType.SolutionCatalog);
                // Upload Solution File with the Web Template (You must copy HomeTemplate.wsp to C:\Windows)
                SPFile solutionFile = spDocumentLibrary.RootFolder.Files.Add("HomeTemplate.wsp", File.ReadAllBytes(@"..\..\HomeTemplate.wsp"));
                // Activate Solution
                SPUserSolution spUserSolution = spSite.Solutions.Add(solutionFile.Item.ID);
                // Activate Features
                Guid solutionId = spUserSolution.SolutionId;
                // Activate Site Collection Features
                SPFeatureDefinitionCollection spFeatureDefinitionCollection = spSite.FeatureDefinitions;
                var features = from SPFeatureDefinition spFeatureDefinition
                               in spFeatureDefinitionCollection
                               where spFeatureDefinition.SolutionId.Equals(solutionId) && spFeatureDefinition.Scope == SPFeatureScope.Site
                               select spFeatureDefinition;
                foreach (SPFeatureDefinition feature in features)
                {
                    spSite.Features.Add(feature.Id, false, SPFeatureDefinitionScope.Site);
                }

                // Get Web Template
                SPWebTemplateCollection spWebTemplateCollection = spSite.RootWeb.GetAvailableWebTemplates(1033);
                SPWebTemplate webTemplate = (from SPWebTemplate spWebTemplate
                                             in spWebTemplateCollection
                                             where spWebTemplate.Title == "HomeTemplate"
                                             select spWebTemplate).FirstOrDefault();
                if (webTemplate != null)
                {
                    spSite.RootWeb.ApplyWebTemplate(webTemplate.Name);
                }
            }
        }
    }
}

Deploy Project
Go to central Admin create new Site collection then save that site collection to template and set name isHomeTemplate.wsp”, download that template and save at C:\Windows Folder
Go to the site where you have deployed the solution. Add webpart
Click button, automatically site collection is created follows as:
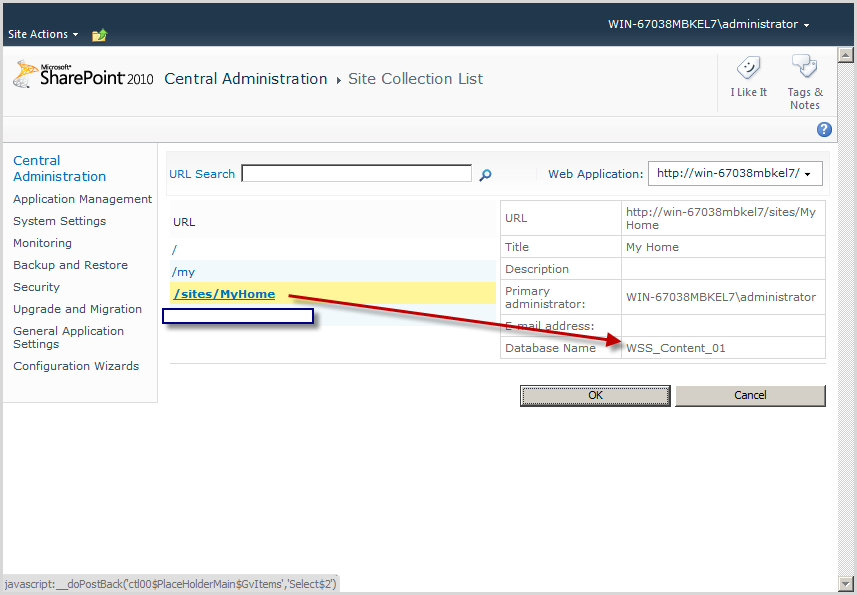
Check in Central Admin, see site collection is created by go to Central Admin => Application Management => View all site collections

How to create custom Document ID in SharePoint 2010


How to create custom Document ID in SharePoint 2010

Download project at here
In this article we will be seeing how to create custom Document ID provider in SharePoint 2010.

Here we are going to see how to create a custom Document ID provider in the format "Site Name . List Name . List item ID".
Open Visual Studio 2010.
Go to File => New => Project.
Select Empty SharePoint Project template from the installed templates.
Enter the Name “MsTechSharingCudtomDocumentID” and click Ok.

Deploy as farm …

Right click on the solution and click on Add a new item.
Select the Class template from the installed template.
Enter the Name as MSTechSharingCustomID.cs and click Ok.

Add the following references.
Microsoft.Office.DocumentManagement.dll

Add the following namespaces.
Using Microsoft.SharePoint;
Using Microsoft.Office.DocumentManagement;

Replace the MSTechSharingCustomID.cs with the following code.

using System;
using System.Collections.Generic;
using System.Linq;
using System.Text;
using Microsoft.SharePoint;
using Microsoft.Office.DocumentManagement;

namespace MsTechSharingCudtomDocumentID
{
public class CustomIDProvider : DocumentIdProvider
{
private string idFormat = "{0} . {1}. {2}";

public override string[] GetDocumentUrlsById(SPSite site, string documentId)
{
string itemUrl = string.Empty;
// Only proceed if we have the site and document id
if (site != null && !string.IsNullOrEmpty(documentId))
{
string[] splits = documentId.Split('@', ' ');
string webName = splits.Length > 0 ? splits[0] : null;
string itemId = splits.Length > 1 ? splits[1] : null;
try
{
SPWeb web = string.IsNullOrEmpty(webName) ? site.OpenWeb() : site.OpenWeb(webName);
SPListItem item = null;
Guid itemGuid = new Guid(itemId);
// Find the item among the lists on the specified web
foreach (SPList list in web.Lists)
{
try
{
item = list.Items[itemGuid];
}
catch
{
//if it's not in this list, go to the next one
continue;
}
if (item != null)
{
itemUrl = web.Url + "/";
itemUrl += item.Url;
}
}
}
catch (Exception) { /* item not found, return an empty array*/ }
}

if (string.IsNullOrEmpty(itemUrl))
{
return null;
}
else
{
return new string[] { itemUrl };
}
}

public override string GenerateDocumentId(SPListItem listItem)
{
if (listItem == null)
{
throw new ArgumentNullException("listItem");
}
return string.Format(this.idFormat, listItem.Web.Title, listItem.ParentList.Title, listItem.ID.ToString());
}

public override string GetSampleDocumentIdText(SPSite site)
{
return string.Format(this.idFormat, "/", "0");
}

public override bool DoCustomSearchBeforeDefaultSearch
{
get { return false; }
}
}
}
 Right Click on the Feature and click on Add Feature.
 
Rename the feature as MSTechSharingCustomIDReciever.
Change scope to site
Right click on CustomIDProviderReciever and click on Add Event Receiver.
Now the entire solution looks like following.

Replace CustomIDProviderReciever.EventReceiver.cs with the following code.

using System;
using System.Runtime.InteropServices;
using System.Security.Permissions;
using Microsoft.SharePoint;
using Microsoft.SharePoint.Security;
using Microsoft.Office.DocumentManagement;
namespace DocumentIDProvider.Features.CustomIDProviderReciever
{
    [Guid("e806be7b-a8e1-40a9-ab9a-037e2eb522c9")]
    public class CustomIDProviderRecieverEventReceiver : SPFeatureReceiver
    {
        public override void FeatureActivated(SPFeatureReceiverProperties properties)
        {
            DocumentId.SetProvider(properties.Feature.Parent as SPSite, new CustomIDProvider());
        }
public override void FeatureDeactivating(SPFeatureReceiverProperties properties)
        {
            DocumentId.SetDefaultProvider(properties.Feature.Parent as SPSite);
        }
    }
}
 
Build and deploy the solution.
Go to the site where you have deployed the solution.
Note: three below steps you aren't need do because it only configure and use Document IDS no code
      ////////////////////////////   ////////////////////////////   ////////////////////////////   ////////////////////////////   //////////////////////////// 

Go to Site Actions => Site Collection Administration => Site collection features => click Active “Document ID Service”
  
    Go to Site Actions => Site Collection Administration => Document ID settings
  
    then input IDS

////////////////////////////   ////////////////////////////   ////////////////////////////   ////////////////////////////   //////////////////////////// 
Add a document and check the document ID. You see document ID have not appeared (if error)
 
How to Solve:
Go to Central Admin => Monitoring => Timer Jobs => Click to “Check job status” link, then find to “Document ID enable/disable job” at “Scheduled” and click to “Document ID enable/disable job” with site which you have deployed the solution.

You see timer job have not ran


Change schedule to minutes: 5 then click Run Now

Continue Go to Central Admin => Monitoring => Timer Jobs => Click to “Review job definitions” link
Click to “Document ID assignment job” link

Change schedule to minutes: 5 then click Run Now

You see have 2 services follow Minutes

Waiting 5 minutes: you see Document ID appear on view

Create new document or upload document again and see document ID with: "Site Name . List Name . List item ID".

Monday, May 7, 2012

How to create Site Collection in a specific Content Database


Add a new Content Database using Central Administration > Application Management > Content Databases > Add Content Database:
Type Database Name

NOTE! Make sure ”Maximum numbers of sites that can be created in this database” minus ”Current number of Sites” equals the largest number in which you want to add the new Site Collection:


View all site collection using Central Administration > Application Management > View all site collections  then you see root Web with WWS_Content database

And see /my (My Site) with WWS_Content database too

Go ahead and create a new Site Collection:
Title: My Home
URL: /sites/MyHome

Go back to the Content Database overview to see that the new Site Collection has been created in the new Content Database:

You can change “Number of sites before a warning event is generated” and “Maximum number of sites that can be created in this database” to make sure new Site Collections are added to the correct content database by click to WWS_Content_01 then edit
“Number of sites before a warning event is generated”: 1
Maximum number of sites that can be created in this database”: 2

“Number of sites before a warning event is generated” and “Maximum number of sites that can be created in this database” is changed

View all site collection using Central Administration > Application Management > View all site collections  then you will see new site collection with another content database


Creating site collection templates


In the article “How to create Site Collection in a specificContent Database” have a site collection was created is MyHome.
Go to Site > Site Actions > Click to Save site as template at Site Actions category
Type File name: MyHome, Template name: MyHome then click OK
Then save site as template successful, download that template and save to C:/ driver
Create site collection from template using Central Admin > Application Management > Create site collections
Title: My Home Template
URL: /sites/MyHomeTemplate
Select a template: <Select template later… > ! Important
Click to “Solution Gallery” link
Upload template “MyHome.wsp” in C:\ driver to solution then Active it
Go back before page you will see tab custom appear with template “MyHome” then click OK

At Visitors to this site: Use an existing group
Member of this site: Use an existing group
Owner of this site: Use an existing group
Then click OK
Result new site collection is created successful from template