ĐÀO TẠO DOANH NGHIỆP : SỞ KHOA HỌC CÔNG NGHỆ TỈNH ĐỒNG NAI

ENTERPRISE TRAINING: DONG NAI DEPARTMENT OF SCIENCE AND TECHNOLOGY.

HÌNH ẢNH TẬP HUẤN LỚP SHAREPOINT WORKFLOW VÀ KIẾN TRÚC SHAREPOINT

PHOTOS OF SHAREPOINT WORKFLOW AND ARCHITECTURE CLASS.

HÌNH ẢNH TẬP HUẤN LỚP SHAREPOINT WORKFLOW VÀ KIẾN TRÚC SHAREPOINT

PHOTOS OF SHAREPOINT WORKFLOW AND ARCHITECTURE CLASS.

Thursday, April 4, 2013

Sharepoint 2010 SharePoint Foundation Help Search Service


Overview

If you activate it, the Help button next to the search input box will navigate your custom help content instead of MS online help

How to do

1.  Go to your site collection | Site Action | Site Settings | Site Collection Administration | click to site collection feature and active “Custom Site Collection Help”

2.     Go to Site Actions >> View All Site content, you will see Site collection Help List Appear, click this
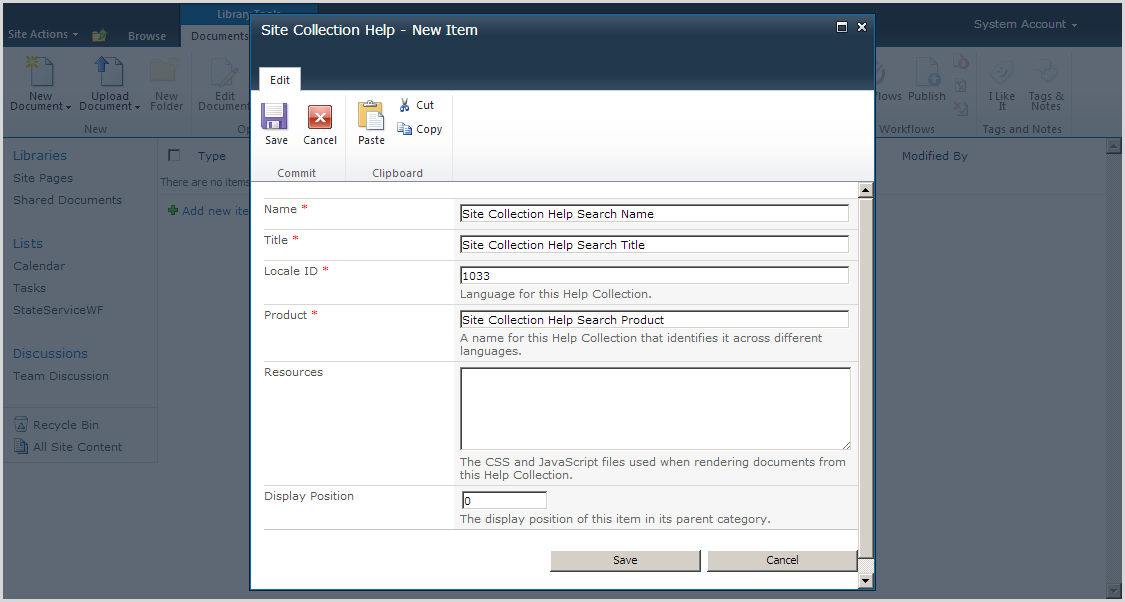
3.     New Document >> Help Collection
4.     Fill information
5.     New Document | Help Category
6.     Fill information
7.     Open word and insert picture from sharepoint site
8.     File | Word Option | click Web Options … button
9.     On Encoding tab | Choose Unicode (UTF-8)
10.  Save word as .htm file
11.  Here is word content
12.  Upload word document to Help category folder
13.  Go to Site Actions >> Site Settings >> under Site collection administration click to Help settings. Check your help search title which you was created
14.  Now, you search and click to Icon Help you will see your “Site Collection Help Search Title” then click this link
15.  Continue click to Help category
16.  You will see the file then click this
17.  Here is your help search file

Sharepoint 2010 State Service


Overview

The State Service is a shared service that is used by some Microsoft SharePoint Server 2010 components to store temporary data across related HTTP requests in a SQL Server database. In SharePoint Server 2010, the State Service is required by InfoPath Forms Services (including out of the box and custom workflow forms), the SharePoint Server 2010 Chart Web Part, and certain Microsoft Visio 2010 scenarios that do not use Microsoft Silverlight 3.

How to do

1. Create new workflow in sharepoint designer then publish to sharepoint

2. Go to your site collection | click to list which list is applied workflow | click workflow on ribbon

3.     Click to the workflow name
4.     You will get error
5.     Make sure State Service Application is started, if don’t have, you can create new by Open “SharePoint 2010 Management Shell” and input this script
$serviceApp = New-SPStateServiceApplication -Name "State Service"
New-SPStateServiceDatabase -Name "StateServiceDatabase" -ServiceApplication $serviceApp
New-SPStateServiceApplicationProxy -Name "State Service" -ServiceApplication $serviceApp -DefaultProxyGroup
6.     Service application is created successfully
7.     Click to the workflow name again
8.     Result as:


Sharepoint 2010 Microsoft SharePoint Foundation User Code Service


Overview

This service runs code deployed as part of a sandboxed solution in a remote, rights-restricted process and measures the server resources used during execution against a site collection-scoped, daily quota.

How to do 

1.     Build webpart solution as sanbox solution then package it to .WSP file 

2.     Go to Site Collection >> Site Actions >> Site Settings >> Click to Solutions >> Upload wsp file to solution 

3.     Start the service “Microsoft SharePoint Foundation User Code Service”

4.     Active WSP file
5.     Stop the service “Microsoft SharePoint Foundation User Code Service”
6.     You can’t active WSP file

Sharepoint 2010 Microsoft SharePoint Foundation Subscriptions Settings Service

Overview

The Microsoft SharePoint Foundation Subscription Setting service is one element of a concept known as multi-tenancy in SharePoint 2010.  The service provides a means of creating and managing logical groups of site collections based on the need to share settings, features and service data.
         Service provides a means of creating and managing logical groups of site collections based on the need to share settings, features and service data. 

How to do

1.     The service “Microsoft SharePoint Foundation Subscriptions Settings Service” is stop
2.     Start service “Microsoft SharePoint Foundation Subscriptions Settings Service” by Open Management Shell input the script below
<# Start Microsoft SharePoint Foundation Subscriptions Settings Service #>
Get-SPServiceInstance | where{$_.GetType().Name -eq "SPSubscriptionSettingsServiceInstance"} | Start-SPServiceInstance
3.     Service “Microsoft SharePoint Foundation Subscriptions Settings Service” is started
4.     Create Service Application Pool, Service Database, Service Application Proxy
$acc = Get-SPManagedAccount  "yourdomain\user"
$appPool = New-SPServiceApplicationPool -Name SettingsServiceApplicationPool –Account $acc 
$app = New-SPSubscriptionSettingsServiceApplication –ApplicationPool $appPool –Name SettingsServiceApplication –DatabaseName SettingsServiceDatabase
$proxy = New-SPSubscriptionSettingsServiceApplicationProxy –ServiceApplication $app
5.     You will see database is created
6.     You will see service application is created
7.     Create new Subscription, Tenant Admin: input the script
<# Creates a new sub #>
$sub = New-SPSiteSubscription
<# Creates Tenant admin site #>
New-SPSite -url http://your web application/sites/tenantadmin -owneralias dicentral\hungdo -owneremail noone@nowhere.com -template tenantadmin#0 -SiteSubscription $sub -AdministrationSiteType TenantAdministration
8.     You will see the site collection is created
9.     Open your site collection
10.  Create Member Site: input the script
<# Creates new member site $sub= http://your web application/sites/tenantadmin #>
New-SPSite -url http://your web application/sites/tenantmember2 -owneralias yourdomain\user -owneremail noone@nowhere.com -template sts#0 -SiteSubscription $sub
11.  Create the second Member Site: input the script
<# Creates new member site $sub= http://your web application/sites/tenantadmin => how can you know: echo $sub#>
New-SPSite -url http://your web application/sites/tenantmember1 -owneralias yourdomain\user -owneremail noone@nowhere.com -template sts#0 -SiteSubscription http://your web application/sites/tenantadmin
12.  You will see two member site on admin site