Step 1: Click Start |
SQL Server Business Intelligence Development Studio | Choose Report Server
Template and named is CustomDesignSSRS
Step 2: Right click
Report | Click Add New Report
Step 3: Add new data
source
In combobox Type choose
“Microsoft Sharepoint List”
Connection string: enter
your web application then click Next
Step 4: Click button
Query builder…
Step 5: Choose Table
name then click icon Filter and Filter with your condition | OK
Step 6: Click Next
Step 7: Choose Report
type is Matrix then click Next
Step 8: Choose fields as
then click Next
Step 9: Set default then
click Next
Step 10: Enter Report
name is: ReportTask | Check to Preview report and click Finish
Step 11: Result as
You can enter value into
textbox and click button View Report
Step 12: Design report
by right click in range contain report | Insert | Table
Step 13: Merge cells
Step 14: Design Finish,
result as
Step 15: Add value of
Fields by expand Datasets | Dataset1 | Drag and drop field to User Interface
(UI)
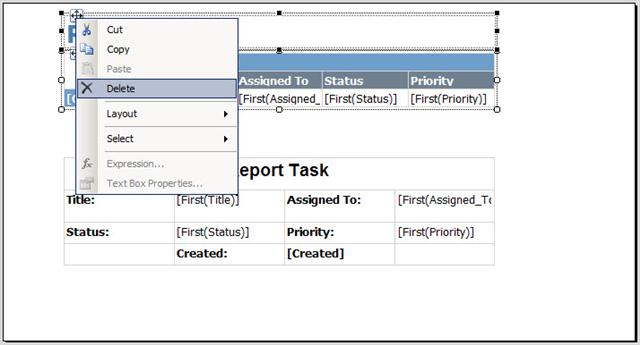
Step 16: Delete old UI
Step 17: Result as
Step 18: Click tab
Preview and enter value then click View Report, result as
Step 18: Open your Web
Application and upload ReportTask.rdl to list library “Shared Documents “
Step 19: Click to
ReportTask and if see error
Step 20: Error because
Reporting configure with External database (Instance MSSQLServer) but do not
configure with Instance Sharepoint (Sharepoint Foundation)
Step 21: Configure again
by choose Instance SHAREPOINT and click Connect
Step 22: Click to “Web
Service URL” link and change port number to 81 (configure above step 3)
Step 23: Click to “Report
Manager URL” link and click Edit change port number to 81 (configure above step
3)
Step 24: Configure
successful
Step 25: Run URLs as
Step 26: Go to Central
Admin | General Application Settings | Reporting Services Integration then
configure as
Step 27: Configuration
successful
Step 28: Back to your
site and refresh page error, enter value and click Apply result as
Step 29: Add Web Part as


0 comments:
Post a Comment